Topology is the study of shapes. Specifically, it is the study of the
properties that don't change when the
shapes are twisted or stretched. Size and proportion have no meaning in
topology. A small oval is the same as an enormous circle. A sphere the
size of the sun is the same as a dumbell you hold in your hand.
To topologists, what matters is the number of holes and twists.
Thus a teacup is identical to a
donut, but there is no way that a teacup could ever be a figure-8.
One of the most intriguing topological constructions
is the Mobius band.
I always start the year with this lesson. These activities are magic
tricks based on mathematics. The first time a group of students sees me
cut the Mobius band in half I invariably get a few "wows."
Mobius was a German astronomer born in 1790.
Although he is usually given credit for the discovery of the band named
after him, he was actually the second person to publish its description. The
mathematician
Johann Benedict Listing described the band in 1861, four years before
Mobius.
Three sections here correspond to the three activities described
in the lesson plan.
Supplies for the basic Mobius band
Each student will need a strip of paper, a pencil, cellophane tape,
and scissors. I recommend preparing 22-inch long strips by taping two 2-inch by
11-inch strips of paper together. Be sure to tape the ends securely all the
way across.
The teacher will need scissors, tape, a marker, and a large "demonstration"
strip. I make 44-inch-long demonstration strips by taping four 4 1/4 by 11 inch
strips together end-to-end.
Each student will need scissors, cellophane tape, and a strip of paper
about 2 1/2 inches wide and 16 inches long. Make the strips by cutting
an 8 1/2 by 11 inch sheet into four 2 1/2 by 8 1/2 inch strips, and then
taping two of these together end to end. Thus one sheet of paper makes
two wide strips.
For young students, I recommend drawing two lines down the middle of the
strips to guide their cutting.
(You will want to draw the lines on the sheet and photocopy it before you
cut and tape the strips.)
You may wish to use the blackline masters, available
as a postscript files or
as a GIF file.
The teacher will need a large demonstration strip, as in the first activity,
tape, and scissors.
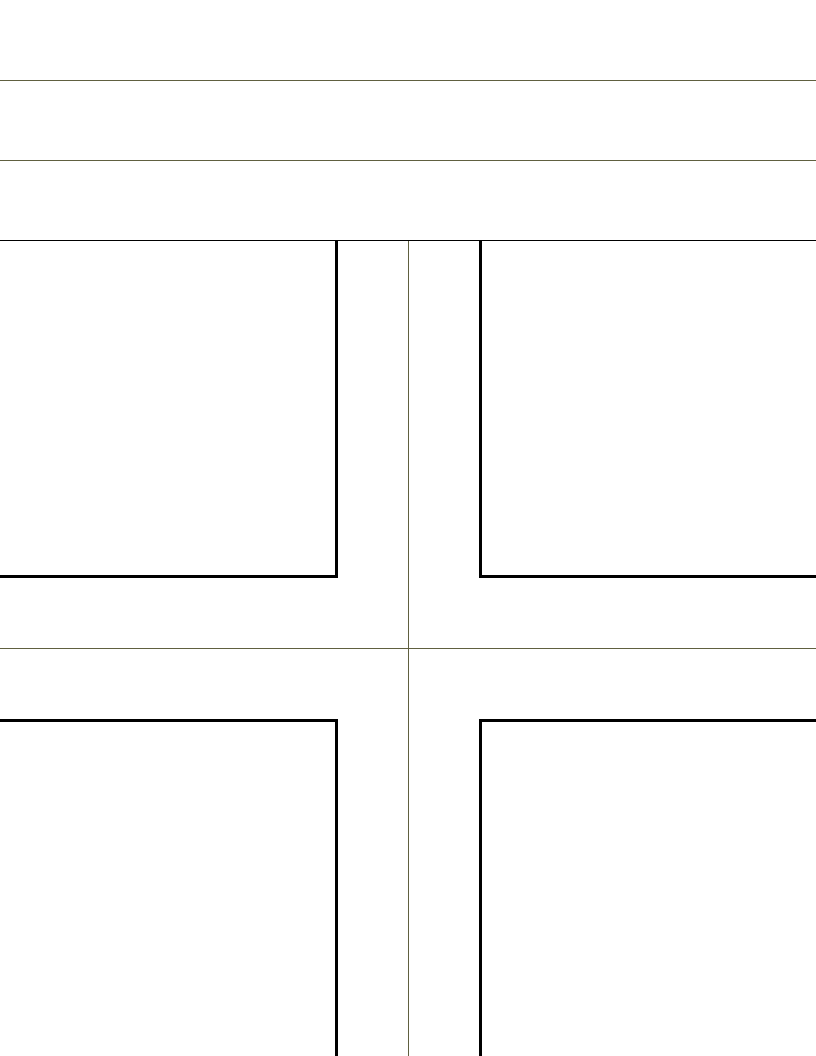
Supplies for the Mobius cross
Each student will need scissors, cellophane tape, and a cross pattern.
You may wish to use the blackline masters, available
as a postscript files or
as a GIF file.
(The cross pattern has half a Mobius strip for the
cutting the Mobius strip in thirds activity on the same sheet.)
The teacher will need scissors, tape, and three demonstration crosses.
I make the demonstration crosses from four 4 1/4 by 11 pieces of paper.
First I tape two pieces end to end. Then I tape the other two pieces end-to-end.
Finally I tape these two strips together to make a paper cross, being sure
to carefully tape all of the edges.
I've broken this lesson into three parts. Part one, the basic Mobius
band, is the introductory activity.
The basic Mobius band (all grade levels)
Using the large demonstration strip, show the students
how to make a Mobius band. Bring the two ends of the strip together,
turn one end over, and tape the ends securely. Be sure to tape all the
way across the edge, or the band will fall apart when you cut it.
You will have a loop with a half-twist in it.
Have the students make their loops into Mobius bands.
Ask the students how many faces, or sides, a piece of paper
has. Ask how many faces the Mobius band has. (The students should say
two. If they don't, tell them you think it has two sides, but you will
do an experiment to find out.)
Tell the students you are going to draw a line down the middle of the band.
Explain that if the band has two sides, you will end up with a line on
one side, but not on the other.
Using a marker, draw a large dot on your demonstration loop. Draw a
line down the middle, moving the loop conveyer-belt fashion, until you
reach the dot. Show the students that the line is on both sides of
the loop. Explain that this means the Mobius band has only one side.
Have the students draw lines down the middles of their Mobius
bands. Younger students may need some encouragement to complete this task.
For older students, you may want to explain that a Mobius band is
a model for a wormhole. I usually introduce this topic by asking how many
of them have watched the TV series Star Trek. I then show that if I wanted
to reach the point opposite (in the sense of going through the paper) the
dot, I could do it in two ways. I could follow my line around the strip,
or I could punch a hole in the strip. The hole is analogous to a wormhole,
except that one must imagine space being twisted through a fourth dimension.
(There is some discussion amongst science fiction fans and physicists
about the reality of wormholes. No wormhole has ever been detected, but no one
has proved convincingly that wormholes are impossible.)
Ask the students what they think will happen if you cut the Mobius
band lengthwise down the middle. (If some students have seen this before,
ask them not to say anything about the result.) Usually students will predict
two separate loops.
Cut your loop in half. Begin by putting a small hole in the center.
Then carefully cut down the middle until your reach your starting point.
Pull the band apart into one big loop. This usually evokes a gasp of awe
from students.
Have the students cut their Mobius bands in half. Make sure they
begin with a hole in the middle. If they cut from the side, as a few
younger students inevitably do, the trick will not work. Encourage them
to cut slowly and carefully. They should not try to follow the lines they
drew, as their lines often are not straight. I tell my students to
pretend they are dividing the band in half so they can share it with their
best friend. They want the two halves to be equal in width.
Some students will put an extra twist in their bands, so that when
they cut them they end up with two loops linked together. I praise these
students for having discovered something interesting about Mobius bands,
and I encourage all students to do further experiments on their own.
For this activity, younger students will need the strips with lines
drawn lengthwise marking them in thirds.
(See preparation).
Make another demonstration Mobius band, and have each of the students
make another Mobius band.
Ask students what they think will happen when you cut your Mobius
band in thirds lengthwise. At this point, I get a variety of replies.
Some students, having learned from the first activity, predict one long loop.
Some predict two, and some three. After calling on a few students, I
usually take a vote, asking how many students in the class expect to end up
with one, two, or three loops.
Cut your demonstration strip in thirds. As you do so, show them how
you have a wide section and a narrow section. Remark that you are cutting all
the way around two times, and that on the second time around, you are cutting
the wide section in half.
Separate the loops. You will end up with two interlinked loops.
Have the students cut their Mobius bands in thirds.
For this activity you will need three demonstration crosses, and
a cross pattern for each student.
(See preparation).
Take one of the demonstration crosses and tape together two opposite
"arms" into an untwisted loop. Then tape the other two arms in another
untwisted loop. The result will look like a twisted figure 8.
Ask the students what they think you will end up with after
you cut both loops around their middles.
Cut both loops down their middles. After the first cut you
will have something resembling a pair of handcuffs. After the second cut
you will have a square frame.
Take the second demonstration cross. Again tape opposite
ends into loops. This time make one plain loop and one Mobius band.
Ask the students what they think you will end up with.
Then cut the loops. The result will be the same as the first demonstration.
Using the third demonstration cross, tape opposite ends together
to make two loops. This time twist both loops into Mobius bands.
Ask the students to predict what will happen. Cut the
loops. This time you will end up with two odd-looking loops. Depending
on how you twisted your loops, the two resulting loops may be separate or
linked together.
Have the students cut out their crosses and tape together opposite
arms to make loops. I allow
each student to choose whether to use plain or Mobius loops. Have the
students cut their loops in half, and talk about the results.
A question that might occur to someone studying topology
is how one should classify solids.
One property that stays constant in a donut-like solid is
the number of holes. The donut shape is called a torus. A figure-eight
is called a 2-torus, a pretzel a 3-torus, and so on.
A foolproof way of finding out how many holes a torus has is by
finding its Euler number. Leonhard Euler was a Swiss mathematician who lived in
the eighteenth
century. He discovered that for any polyhedron that can be mapped on to
the surface of a sphere (a 0-torus), the number
of vertices plus the number of faces minus the number of edges always
equals two.
Several decades later, Simon Antoine-Jean Lhuilhier found
that this is not true for solids with holes in them.
For example, on a 1-torus, vertices plus faces minus edges equals zero.
The general formula for a torus is:
vertices + faces - edges = 2 - 2 X holes
The quantity (vertices+faces-edges) is called the Euler number
of the solid.
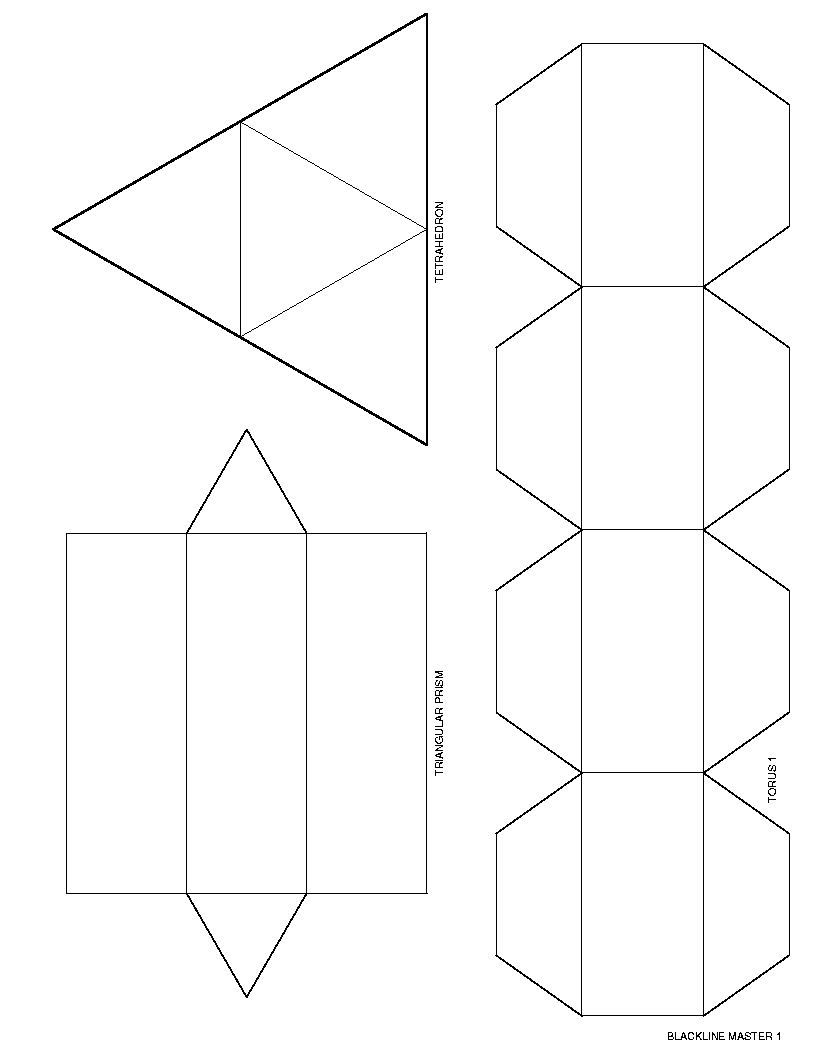
Each student will need patterns for cutting and
folding the
shapes, scissors, and cellophane tape.
(These patterns are available as
postscript files or as GIF files:
topo1 and
topo2.)
The teacher will need pre-cut shapes and
tape. I make my pre-cut shapes out of construction paper, and I make
them larger than the ones the students will use.
Have the students cut out the pattern for the tetrahedron and
explain how to assemble it.
Define FACES, VERTICES, and EDGES.
A FACE is a bounded flat surface, like a triangle or a square.
The faces of the tetrahedron are triangles.
An EDGE is a line segment at which two faces join.
A VERTEX is a point at which edges and faces join.
Ask the students how many faces (4), vertices (4), and edges (6) the
tetrahedron has. Start a chart on the blackboard with the
headings FACES, VERTICES, and EDGES in that order.
Have the students cut out and assemble the triangular prism.
Ask them to count faces, vertices and edges. Add these
numbers to the chart. (Because of the symmetry, it is easy
to get confused when counting edges. However, after I asked
the students what the number of edges should be a multiple of,
they correctly counted nine.)
Have the students cut out and assemble the octahedron.
Ask them to count faces, vertices and edges. Add these numbers
to the chart.
Write a plus sign between the number in the FACES column and
the number in the VERTICES
column in each row of the chart. Write a minus sign between
the number in the VERTICES column and the number in the EDGES column
in each row, and write an equals sign after the number in the EDGES
column in each row. Thus the first row will read "4+4-6=", the
second row will read "5+6-9=" and the third row will read
"8+6-12=." Have the students compute the sums. Explain that
2 is the Euler number for the solids.
Have the students cut out and assemble one of the toroidal solids.
Ask them to count faces, vertices, and edges. Having counted
16 faces and 16 edges, many students will suggest that there
should be 30 edges. There are in fact 32 edges. Add these
numbers to the chart. Compute the Euler number for this solid.
Ask the students what is the difference between the first three
solids and the last solids. You want them to say that there is
a hole in the last one, but this is not always obvious to
students, who may look for a more complicated explanation.